The best way to document water damage for your insurance company in Piperton
When water invades your Piperton home the first 24 hours determine whether your insurance claim succeeds or fails. Proper documentation proves the damage happened the way you say it did and prevents your adjuster from undervaluing your loss. This guide shows you exactly what photos to take moisture readings to collect and forms to fill out before the adjuster ever arrives. Rapid water restoration for business owners in Downtown Memphis.
Why Piperton homes need special documentation
Piperton sits on the Loess bluffs where silty soil and high water tables create unique water damage patterns. Homes here often suffer from foundation seepage during heavy rains while nearby Collierville properties face different challenges. The soil composition means water travels differently underground affecting where damage appears and how it spreads. Understanding these local factors helps you document the true extent of your loss. Water Damage Restoration Collierville.
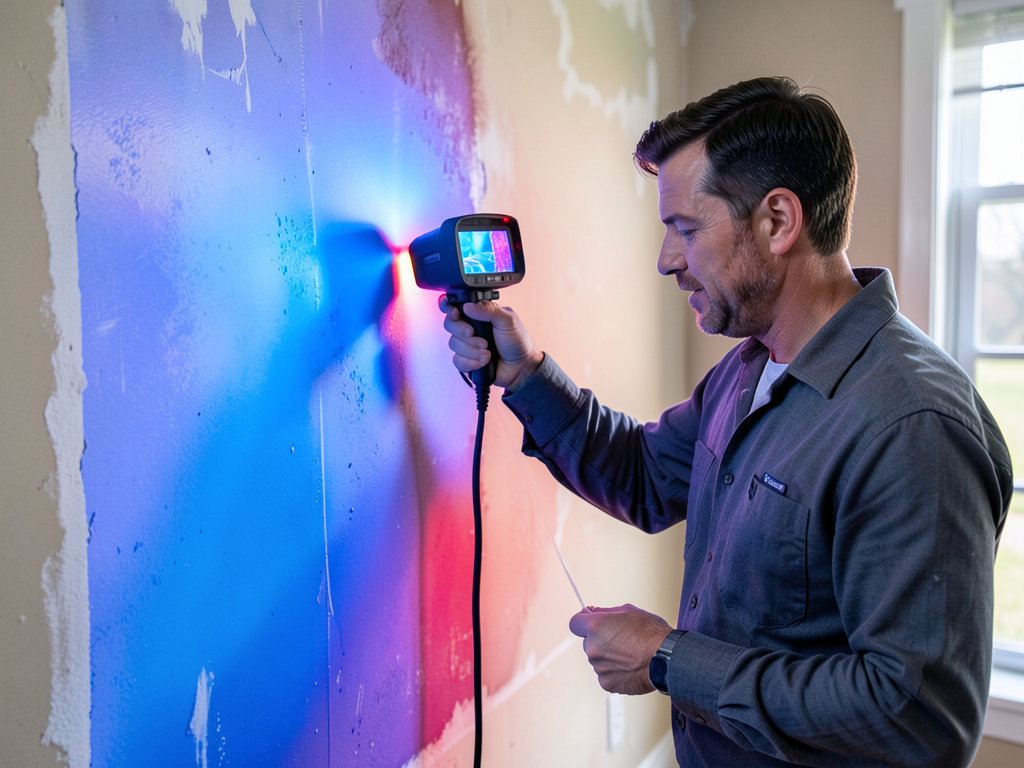
Technician using thermal imaging camera to detect hidden moisture behind walls in a Piperton home showing temperature differentials in blue and red.
Step 1: Safety and immediate mitigation
Before touching anything turn off electricity to affected areas. Wear rubber boots and gloves when walking through standing water. Open windows for ventilation but avoid using fans that might spread contaminated water. Document every safety step you take with photos or short videos. Insurance companies expect homeowners to prevent further damage under the legal principle of “mitigation of damages.”
Step 2: Wide-angle damage photography
Take photos from every angle before touching anything. Start with wide shots showing entire rooms then move closer to specific damage. Include photos of:
- Water levels on walls using a ruler or tape measure
- Wet flooring from multiple angles
- Water stains on ceilings showing spread patterns
- Baseboards and trim damage
- Any visible mold growth
Time-stamp all photos using your phone’s date stamp feature or write the date on a piece of paper and include it in some shots. Insurance adjusters look for timestamp evidence to verify when damage occurred.
Step 3: Close-up evidence collection
Photograph serial numbers on damaged appliances water heaters and HVAC equipment. Include brand names and model numbers. Take close-ups of:
- Electrical outlets showing water damage
- Water meter readings if visible
- Foundation cracks or seepage points
- Damaged personal property with identifying marks
Use your phone’s macro mode for clear serial number photos. These details prove ownership and value when filing claims.
Step 4: Moisture mapping with professional tools
Moisture meters measure water content in materials. Non-penetrating meters work on surfaces while penetrating meters check deeper. Take readings in:
- Multiple wall locations at different heights
- Floor areas at 12-inch intervals
- Ceiling joists if accessible
- Behind removed baseboards
Record all readings on a simple grid sketch showing room layout. Note material types since drywall holds moisture differently than hardwood. This mapping proves drying progress later. Can you save the hardwood floors in your Cooper-Young bungalow after a flood?.
Step 5: Contents inventory creation
Create a detailed list of damaged items including:
- Item description and age
- Brand name and model number
- Original purchase price or estimated value
- Condition before damage
- Replacement cost estimates
Photograph items individually before moving them. Group similar items for efficiency but document each piece separately in your inventory list. Use a spreadsheet to organize this information for easy claim submission.
Step 6: Professional drying documentation
Dehumidifiers and air movers need monitoring logs. Record:
- Equipment setup locations
- Daily humidity readings
- Temperature logs
- Moisture content readings from materials
- Equipment run times
These logs prove you followed industry standards for proper drying. Insurance companies expect documentation showing drying goals were met according to IICRC S500 standards.
Step 7: Communication logs
Keep detailed records of every conversation with:
- Insurance company representatives
- Adjusters by name and contact information
- Restoration contractors
- Utility companies
Write down dates times and summaries of what was discussed. Save all emails and text messages. This paper trail prevents misunderstandings about what was agreed upon.
Step 8: Proof of loss statement
The proof of loss form is your official claim document. Include:
- Total claimed amount with itemized breakdown
- Supporting documentation for each item
- Estimates from contractors
- Photos and moisture readings
- Contents inventory
Submit this within your policy’s required timeframe usually 60-90 days after the loss. Late submissions can result in claim denial.
Step 9: Working with adjusters
Be present when the adjuster inspects your property. Walk them through the damage explaining what happened. Show them your documentation including:
- Photo timeline
- Moisture maps
- Contents inventory
- Equipment logs
Point out damage they might miss like inside cabinets or under flooring. Your presence ensures nothing gets overlooked.
Step 10: Final documentation package
Compile everything into one organized package:
- Cover page with claim number and contact information
- Table of contents
- Damage timeline
- All photos organized by room
- Moisture readings and maps
- Contents inventory
- Equipment logs
- Communication records
- Estimates and invoices
Provide both digital and printed copies to your adjuster. This professional presentation shows you’re serious about your claim.
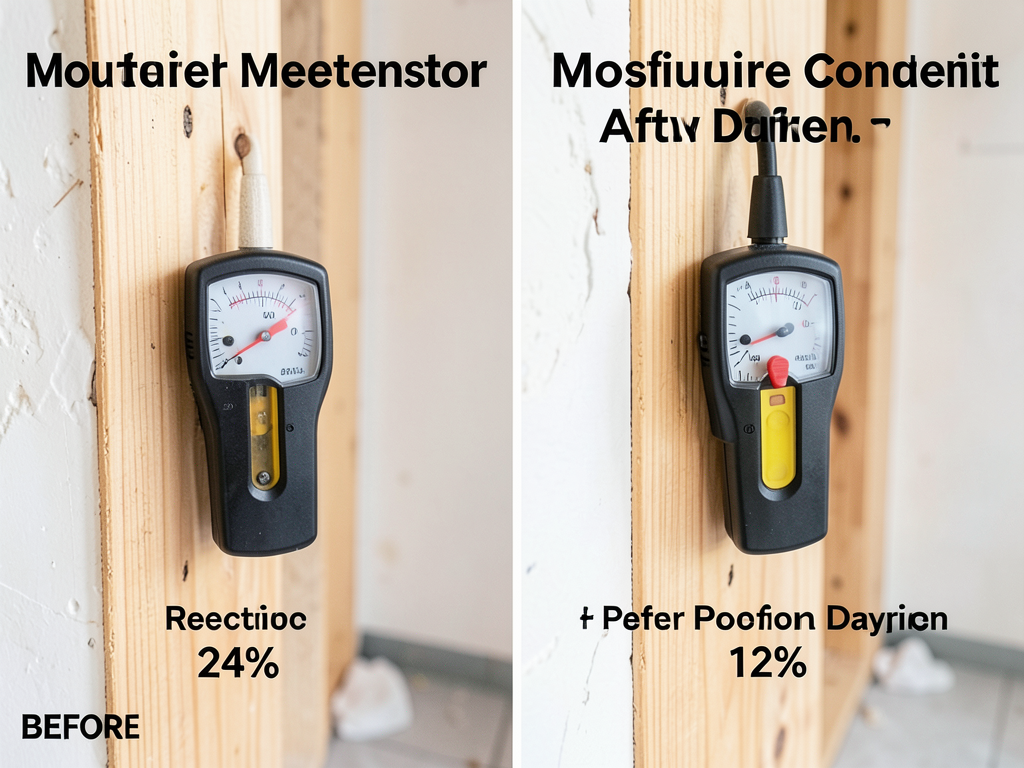
Before and after moisture meter readings showing reduction from 24% to 12% moisture content in wall studs after professional drying.
Memphis-specific considerations
Piperton’s location means you deal with unique water damage patterns. The area’s high humidity slows natural drying requiring professional equipment. Summer thunderstorms can overwhelm drainage systems causing flash flooding. Winter freezes may burst pipes in attics or crawl spaces. These local factors affect how damage spreads and what documentation matters most.
According to Shelby County building codes homes in flood-prone areas need specific documentation for structural repairs. Your proof of loss should reference these local requirements when claiming structural damage. The Tennessee Department of Commerce and Insurance also provides guidelines for water damage claims that your documentation should follow. Tennessee Department of Commerce and Insurance.
Common documentation mistakes
Avoid these errors that can hurt your claim:
- Waiting too long to start documentation
- Throwing away damaged items without photos
- Cleaning up before documenting
- Missing serial numbers on appliances
- Providing incomplete inventory lists
- Failing to track drying progress
Each mistake gives adjusters reason to reduce your payout. Take your time and be thorough.
When to call professionals
Call Victory Water Damage Restoration at (901) 640-3133 when:
- Water covers more than one room
- You see mold growth
- Water affected electrical systems
- Damage involves sewage or contaminated water
- You need help with documentation
Professional restorers document everything using industry-standard software that insurance companies trust. Their reports include Xactimate pricing that matches what adjusters use.
Moisture meter showing 18% reading on drywall compared to normal 12% baseline, indicating active water intrusion.
Documentation timeline
Follow this schedule for best results:
- Hours 0-24: Safety, photos, initial mitigation
- Days 1-3: Detailed documentation, contents inventory
- Days 4-7: Professional assessment, moisture mapping
- Days 8-14: Equipment setup, drying logs
- Days 15-30: Final readings, proof of loss prep
Sticking to this timeline prevents evidence from disappearing and shows insurance companies you acted responsibly.
Insurance company expectations
Insurance adjusters look for specific documentation:
- Clear cause of loss
- Extent of damage
- Mitigation efforts
- Repair estimates
- Contents valuation
They compare your documentation to their internal standards. Missing any element gives them reason to reduce your claim. Your documentation should answer every question before they ask.
Protecting your claim
Keep all documentation in multiple formats:
- Cloud storage for photos and documents
- Physical copies in a waterproof folder
- Backup drives with all files
Share only what’s necessary with your insurance company. Don’t post damage photos on social media where adjusters might see them and question your claim.
Final checklist before adjuster arrives
Before the adjuster visits verify you have:
- Complete photo timeline
- Moisture readings from all affected areas
- Contents inventory with values
- Equipment logs showing drying progress
- Communication records
- Professional estimates if applicable
Organize everything chronologically. Create a summary sheet highlighting key points. This preparation shows professionalism and increases your chances of full coverage.
Frequently Asked Questions
How long do I have to document water damage?
Start immediately and continue throughout the restoration process. Most policies require proof of loss submission within 60-90 days but earlier is always better.
Should I clean up before documenting?
Never clean up before taking photos and moisture readings. Document everything first then begin safe mitigation to prevent further damage.
What if I can’t afford professional restoration?
Document everything yourself and submit to insurance first. Many companies advance funds for emergency services. You can also rent drying equipment and track progress yourself. Emergency Dehumidifier Rental.
Take action now
Water damage documentation determines your insurance payout. Missing photos or incomplete inventories cost homeowners thousands in underpaid claims. Don’t let poor documentation reduce your recovery.
Call (901) 640-3133 today to schedule your inspection. Victory Water Damage Restoration provides professional documentation that insurance companies trust. We’ll create the detailed reports needed for maximum claim approval.
Pick up the phone and call (901) 640-3133 before the next storm hits. Proper documentation starts with a single phone call.
Don’t wait until it’s too late. The difference between a $5000 and $20000 claim often comes down to documentation quality. Call now and protect your investment. For more information, visit Shelby County building codes.
{
“@context”: “https://schema.org”,
“@type”: “BlogPosting”,
“headline”: “The best way to document water damage for your insurance company in Piperton”,
“description”: “Learn the exact steps to document water damage in Piperton homes. Get expert tips on photos, moisture readings, and insurance forms to maximize your claim payout.”,
“wordCount”: 1508,
“datePublished”: “2026-03-14T08:12:00.000Z”,
“dateModified”: “2026-03-14T08:12:00.000Z”,
“inLanguage”: “en-US”,
“mainEntityOfPage”: {
“@type”: “WebPage”,
“@id”: “https://victorywaterdamagerestorationmemphis.com”
},
“publisher”: {
“@type”: “LocalBusiness”,
“name”: “Victory Water Damage Restoration Memphis”,
“url”: “https://victorywaterdamagerestorationmemphis.com”
},
“author”: {
“@type”: “Organization”,
“name”: “Victory Water Damage Restoration Memphis”,
“url”: “https://victorywaterdamagerestorationmemphis.com”
},
“image”: {
“@type”: “ImageObject”,
“url”: “https://victorywaterdamagerestorationmemphis.com/wp-content/uploads/2026/03/the-best-way-to-document-water-damage-for-your-ins-1.png”
}
}
{
“@context”: “https://schema.org”,
“@type”: “LocalBusiness”,
“name”: “Victory Water Damage Restoration Memphis”,
“url”: “https://victorywaterdamagerestorationmemphis.com”,
“address”: {
“@type”: “PostalAddress”,
“addressLocality”: “Memphis”
},
“areaServed”: {
“@type”: “City”,
“name”: “Memphis”
}
}
{
“@context”: “https://schema.org”,
“@type”: “FAQPage”,
“mainEntity”: [
{
“@type”: “Question”,
“name”: “How long do I have to document water damage?”,
“acceptedAnswer”: {
“@type”: “Answer”,
“text”: “Start immediately and continue throughout the restoration process. Most policies require proof of loss submission within 60-90 days but earlier is always better.”
}
},
{
“@type”: “Question”,
“name”: “Should I clean up before documenting?”,
“acceptedAnswer”: {
“@type”: “Answer”,
“text”: “Never clean up before taking photos and moisture readings. Document everything first then begin safe mitigation to prevent further damage.”
}
},
{
“@type”: “Question”,
“name”: “What if I can’t afford professional restoration?”,
“acceptedAnswer”: {
“@type”: “Answer”,
“text”: “Document everything yourself and submit to insurance first. Many companies advance funds for emergency services. You can also rent drying equipment and track progress yourself. Emergency Dehumidifier Rental.”
}
}
]
}
{
“@context”: “https://schema.org”,
“@type”: “BreadcrumbList”,
“itemListElement”: [
{
“@type”: “ListItem”,
“position”: 1,
“name”: “Home”,
“item”: “https://victorywaterdamagerestorationmemphis.com”
},
{
“@type”: “ListItem”,
“position”: 2,
“name”: “Blog”,
“item”: “https://victorywaterdamagerestorationmemphis.com/blog”
},
{
“@type”: “ListItem”,
“position”: 3,
“name”: “The best way to document water damage for your insurance company in Piperton”
}
]
}
{
“@context”: “https://schema.org”,
“@type”: “Service”,
“serviceType”: “Water Damage Restoration”,
“provider”: {
“@type”: “LocalBusiness”,
“name”: “Victory Water Damage Restoration Memphis”,
“url”: “https://victorywaterdamagerestorationmemphis.com”
},
“areaServed”: {
“@type”: “City”,
“name”: “Memphis”
},
“description”: “Learn the exact steps to document water damage in Piperton homes. Get expert tips on photos, moisture readings, and insurance forms to maximize your claim payout.”
}